House

House

Tuesday, November 22, 2022

Raising the Roof

Back for another catch-up post!  This one goes through several months and gets us pretty close to current status.

Taking down the roof and getting the new knee wall in place

Even though the front roof was well supported, we collectively held our breath during this part

Getting the new third floor into place

=
Back wall and roof framing going up

Starting to look like living space

Hey, there's a dormer

Not weathertight but getting closer here

Toggling back to the inside - for awhile, we had a small ladder from the first floor to the second.  Not too bad, although Bella had to sleep in the living room.  Climbing ladders is not her thing!

Then the guys opened up the first floor to create the full three story stairwell.  And this happened:

Yep, for a few days, we had ladders spanning from the basement to the second floor.  No wine in the evenings when this climb awaited!
Fortunately, they built the permanent platforms and temporary stairs pretty quickly.  Still not OSHA approved but much better

Moving back to the outside - installing the new windows, with siding and trim already on

New windows in the front too - and you can see the new full length cutout under the curved stairwell window.  We had to wait until that brick was cut to custom order the window so lived with this makeshift plywood/window covering for awhile.  I'm sure the neighbors loved it

Brian took a couple days off and tackled the screen porch.  It was supported by hollow - and now rotting - 6x6 wood columns so he pulled the screens and the columns out and replaced them

New 4x6 pressure treated posts in place - screens will be reinstalled next spring

Also worked on some plumbing - running new Pex lines (this panel is now full) and installing a new water heater in the basement utility closet

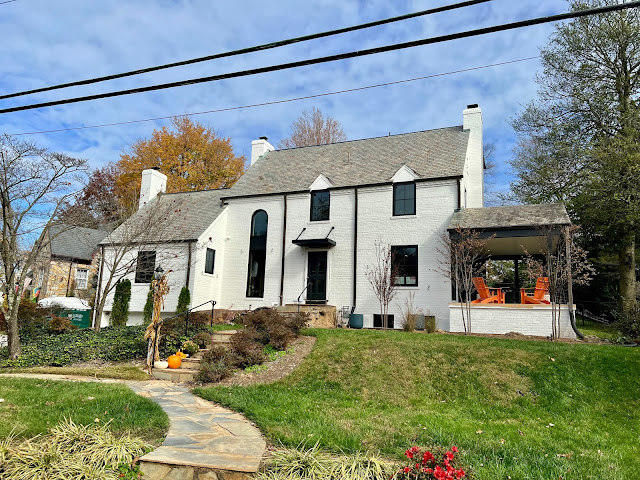
Skipping ahead in the timeline again: once the structural work was done and all the windows were in, we had the entire exterior repainted.  The white paint on the brick was peeling so the painters did a full scraping, primed the brick, and then put on two new coats of white (Sherwin Williams Snowbound).  Then a single coat of black (Sherwin Williams Tricorn Black) on the Hardie siding.  The Hardie was pre-painted but the finish is so fussy that it ended up with some nicks and scraps during install.  A once-over with a new coat of paint did wonders.

Painting in progress

And from the front

And we're finally at the stage of some "after" pictures!  We'll paint the porch floor and add the screens next spring (not to mention redoing the front landscaping and finishing the back steps/porch) but the house is finally looking like we envisioned.

Not bad.  Not bad at all

 
Now that's a house!

Monday, November 21, 2022

Farewell to the Peach Palace

As usual, I'm extremely far behind on updating the blog so in an attempt to start somewhere (anywhere), here goes.

We started Phase II of construction in April 2022, working - happily - with the contractor who did our first big project, Oscar Villatoro at Oscar Construction.  It's now many months later and his part of the project is complete so I can say that working with him again was the best decision we could have made.  It didn't mean the project went perfectly (no construction project ever does) but he made things as easy as possible for a substantial project. 

So let's talk about the project!  Phase II entailed taking off the back half of the existing slate roof, adding a shed dormer, and gutting the entirety of the existing house (anything that hadn't been gutted and rebuilt in Phase I, that is).  As with past projects, by the time we're finished, the only original thing left on the house will be (some of) the exterior walls.  

During this time, we've crammed ourselves into the finished space from Phase I, which is to say, into the kitchen and family room on the first floor and the primary bedroom/bath/closet on the second floor.  It is...tight.  I'm not going to share a picture of the stack of furniture in our bedroom corner because when this project is over, I'd like to forget it ever existed.

But onto the exciting part!  A few before pictures.  So. Much. Peach.

The dining room

The living room - with a little demo started (we pulled out some of the built-ins, trim, fixtures, and fireplace mantels so they could live a second life elsewhere)

The existing stairwell, complete with matching peach carpet and even more peach walls.  Also, the hallway leading to the galley kitchen, entrance to the den (now blocked as the den became the new family room) and the basement

Looking into the dining room and the already demo'd old galley kitchen - there were so many doors in this little space

And now into the demo pictures!

We moved the stairwell to an entirely new location and reclaimed the old stairwell space for the second floor - won't be walking up these stairs anymore!

There used to be three bedrooms and two bathrooms in this space - gone now and about to be rebuilt as two bedrooms, two baths, and a laundry room.  The ladder went up to the old attic space but was soon removed as the new stairwell runs all the way to the third floor

We kept the old stairwell window so we could preserve the front exterior but now the second floor cuts it in half.  This will all make sense soon, just stay tuned!

Taking down the old attic floor joists and preparing to remove the roof to build the dormer

Another shot of the second/third floors, with the new stairwell opening.  A ladder serves as stairs which is...not convenient
Slightly closer up picture of stairwell opening - the plywood door to the right is protecting our finished bedroom space

Stairwell without stairs

Getting ready to remove the back roof

Taking off the slate

No going back now!

The outside is inside


Ready for rain (but thankful for clear skies)

More updates to follow as I work through our backlog of pictures!

Thursday, October 13, 2022

Quick update - a return to outdoors

We're still here, still working - I'll have a much longer blog post, eventually, on all the changes inside the house (total demo of the original space, new dormer on the back).  But we took a break from that larger project this past weekend in order to transform an outdoor space that has been bugging us for years - the very messy, very overgrown front side yard.  Let's go to the photos!

Here are the before pictures.  We'd already started taking down some of the bushes before we took this picture - it just doesn't look like it because everything is so overgrown!  These were mostly azaleas with some boxwoods and other random bushes thrown in, all covered in vines and ivy.  The two dogwood trees were dead and mostly dead, respectively, having been strangled by the aforementioned vines.  In short, this was not attractive landscaping.  And, it was taking up a lot of space on our yard and the neighbor's yard and only getting worse over time.


As usual, we neglected to take many in-progress pictures.  But here are a couple with about half the shrubs cut down and some of the new evergreen trees in the empty space as we try to figure out layout.


And now with the whole row gone!  I should have taken a picture of the enormous piles of brush this project created.  We do have the scratches to prove we removed every branch and dragged them away.


Had to call in the stump grinder to take care of a few tree stumps.  And then regraded, by hand, the whole area.  


The big reveal!  The evergreens are a mix of Thuja Plicata Sugar and Spice and Arborvitae Yellow Ribbon, planted in groupings of three.  The two trees on each end are Canada Red Cherry trees and the bigger one in the middle is a chalk maple.  We also replanted the Sunshine Ligustrum (the yellow bushes) from the backyard terrace to the front, interspersed them with two DeGroot's spiral evergreens, and relocated some nandina, grasses, and added some new spirea around the trees to fill out the whole space.      


We may add one more set of bushes right at the street to grow around the telephone pole and we'll definitely add mulch and cut in the beds for a more defined look.  For now, there's not quite as much screening between the houses as before but it looks much more intentional and these plants have room to grow.  All in all, not bad for a weekend of work!

Saturday, January 15, 2022

One part partly done

Another long-overdue update - we've spent the spring/summer/fall making decisions, tracking down supplies, and doing install and the work has paid off in that we are now officially moved into the addition!  Not that moving into the addition means we're done (not even close) but it does mean we are done enough to live in the new space.  And living in the new space - with hardwood floors, a large kitchen island, and double bathroom sinks, among other things - is a delight.  Onto the pictures!

Starting in the kitchen - pretty much a blank slate to begin:


Cabinet delivery day!  This is a lot of cabinets...


Getting started.  There is a method to the madness here, it's just hard to tell what that method is!  But installation involved liberal use of the laser and levels to make sure everything was straight.


Top and outer cabinets all installed and starting to move to the upper cabinets.


Now this is starting to look like the plan!  Getting the island set into place and figuring out spacing for everything.


Blocking out the bar top overhang and the table on the end to see how it'll all fit together.


Once we had the cabinets installed, there was a long lag while we selected a countertop (Calacatta Miraggio Gold) and then had it installed and waited months for our appliances to arrive.  Fortunately, our old kitchen was still in place so even though it was somewhat unsatisfying to have a new yet unusable kitchen in the house, there wasn't much rush to get things done.

Finally getting appliances installed - hello wine fridge!  You will be well loved here.

This is looking more complete (although still missing two backordered bar stools here).  Microwave and dishwasher are installed in the island.


Custom walnut table built by Brian for the eat-in and integrated refrigerator column and freezer drawers hiding behind the walnut panels on the right


Just need a backsplash and light fixture over the table and this space will be complete!


And now moving on to the primary bathroom on the second floor of the addition.  We decided to use extra large format white marble tiles for the shower - and made good use of the family room floor space to lay everything out first.  The tiles are not meant to fit together perfectly (though some do) so it was a bit of a puzzle to make sure we liked how the veining looked once it was all together.


Skipping forward - tiles on the walls!


Next up, a gray cement look tile for the floor.


Now with grout, fixtures, and glass shower door!  If only things moved as quickly in real life as these few pictures imply.


The vanity is a custom cabinet by the same company that made our kitchen cabinets.  Bathroom fixtures are Moen Doux and countertop is Calacatta Miraggio (the same as the kitchen but with gray veining).


Then we made our first attempt at wallpaper using Owens wallpaper in Denim by Serena & Lily.  I had read that this wallpaper was somewhat fussy to work with and agree with that assessment.  Maybe not the best choice for our first wallpaper attempt but fortunately, the small, single wall turned out well enough to keep it.  We painted the bathroom walls in the same color as the rest of the addition (Benjamin Moore Silver Chain) before we picked out tile.  Then we committed to the gray cement look floor tiles and didn't love just how much gray was in the bathroom everywhere.  So this feature wall introduces a nice bit of color into the room.


And now with custom white oak framed mirrors built by Brian.


And now back down to the first floor but the other side this time - the family room space adjacent to the kitchen.  Because this is part of the existing house, the new windows are set back so Brian built custom walnut frames for them.


The old fireplace was plain red brick and needed an upgrade so we started by installing a black tile threshold here.


Then moved onto a new tile surround.


Then Brian went back into his workshop to build a custom white oak mantle.


Just dry fitting it here before we grout the tiles.


And done!  Just in time to get our Christmas tree up.


That's a lot of updating to cover a lot of months!  We're taking a bit of a break over the winter now while we gear up to start the second big part of the renovation - gutting the rest of the existing house and adding a dormer to the back, plus finishing the basement, redoing the front yard and its retaining walls, and various and sundry other tasks.  For now, focusing on what is done so we can take the rest of this project one step at a time.  Happy New Year!