House

House

Monday, October 28, 2013

Getting closer


Most of the big projects are complete. The stairwell and fireplace surround are pretty much it for big projects on the to so list. What we have plenty of are small projects. Like painting. Any given weekend we seem to be painting or procrastinating on painting that needs done. The mudroom got a fresh coat of semi gloss white as did the barn doors. I also set the basement vanity and installed the lights in there. It would be helpful to have everything finished at once to be more efficient when it comes time to paint, but this works better for us since we do all of the work. There's not much in terms of pics other than a few progress shots. 

We also said goodbye to our beloved Bobcat. It was a sad day on Sunday... but we did sell it for more than we paid so that helped console us a bit. Hopefully we will buy a bigger and better one next project! 


Bye Bobcat! You will be missed!


Monday, October 21, 2013

How to Build a Custom DIY Sliding Barn Door

This weekend we tackled another big project in our quest to finish up this house. It took us most of the weekend to finish, but we now have functioning sliding barn doors for the mud room and den/flex space. The process was fairly straight forward, but a little time consuming. We used sheets of 1/2" veneer plywood as the base and tacked on the trim in a pattern to somewhat match our other doors in the house. We tried buying these doors from Jeld-Wen to completely match our existing doors in the house, but the largest they come in is 36" and we needed 39" for the mudroom and 49" for the den/flex space. Our ceilings are just over 8' high so a normal 4x8 sheet of plywood worked for us. We also used baseboard trim for our stiles/rails as it was wider than anything else we could find and also the thickness was just right at 9/16". This did require using our table saw to rip off the milled edge to give us two squared edges.

Materials:
- 1/2" veneer 4'x8' plywood
- 6" floor trim (ripped to cut off the milled edge)
- wood glue
- 1 1/4" plus 3/4" 18 gauge nails
- Track hardware from http://hangingdoorhardware.com/pocketdoors/industrial_door_track.htm. We used the 290 style tracks since our doors were definitely going to be under 400lbs. I highly recommend this site for tracks and hardware as they are very reasonably priced and have fast/cheap shipping.
- band-aids (for when you shoot a nail through your finger)

Tools:
- air nailer
- chop saw/miter saw
- table saw
- circular saw with guide for ripping 8' sheets of plywood (or a very steady hand)

We pre-primed and sanded our veneer plywood to make it easier to finish paint. Cut to size, ready for trim.

Figuring out the layout of the trim. 

Close up of the trim we used after we ripped off the decorative part.

We need an extra inch on the sides plus I wanted to get rid of the plywood edge so we added a 1/2 filler strip.

First stile trim added - glued and nailed.

Fitting in the rails - glued and nailed again. I tried to get as tight a fit as possible so plan to trim each piece carefully multiple times if necessary.

Coming along.

First side done! The angle was a pain. I used an angle finder and then used a scrap piece to find the perfect fit.

Back side of the den door. I wanted the door to slide over the existing baseboard trim so I left a 5 1/2" gap at the bottom.

Back side done with the added gap for the baseboard trim. 

Working on the smaller mudroom door. 

Side one of mudroom door complete. 

Backside of mudroom door with the same 5 1/2" gap for the baseboard trim. 

Dry fitting doors before putting on hardware. Almost a perfect fit!

Adding sliding hardware. 

Mudroom door installed.

Close up of the gap I left to slide by the existing base trim. 

Den door installed and sliding.

Both doors installed and closed. All that's left is some sanding and finish paint.

Tuesday, October 15, 2013

Finishing Touches

Brian has continued to work on the mudroom, putting our various tools to good use (the chop saw, table saw, and brad nailer are figuring heavily into his work these days) as he trimmed out the cubbies and built the window seat.  The trim has made a huge difference - it all looks like built-in furniture now.  It's just the look I was hoping for when we first started thinking about doing a mudroom so I'm really pleased with the result.  For the cubbies, we used 1 x 2 trim for most of the areas, although we had to custom rip a number of the pieces.  On the sides, we added shoe molding on the inside to give it a little extra detail and then put crown molding on top to make it look more like a piece of furniture.  On the window seat, we used 1 x 3 trim for a chunkier look.  We'll attach the top of the window seat with piano hinges so there will be extra storage under the seat.  We also still need to putty the nail holes, finish caulking, and give everything a coat of paint but it's nearly done...and I'm really happy with the way it's all turned out.  See for yourself...

Trimming the legs of the bench/cubbies

More trim in progress


And...done! 

Window seat space

Box built, trim in progress

Just need to add the top and we're done here!

Sunday, October 6, 2013

Cubby Construction

We started working on the mudroom this weekend, planning and building a bench, cubbies, and storage.  The planning part of this project took as long, or possibly longer, than the actual building part.  We had a rough idea of the general dimensions and layout that we wanted but actually putting pencil to paper and making decisions took quite some time.  And, consulting the internet just led to even more opinions and options then we had when we first started.  But we finally buckled down and just started ripping 3/4" ply to build a nice big bench.  We had a new tool to try out as well - the Kreg Rip Cut.  It's not the easiest thing to use but it is easier than trying to rip 4' x 8' pieces of 3/4" ply with a table saw and, given how many cuts we had to make, we were glad to have it.  We also did a little prep work beforehand, priming and sanding the plywood before we started making cuts.  Hopefully that will pay off in the end when it's time to paint.

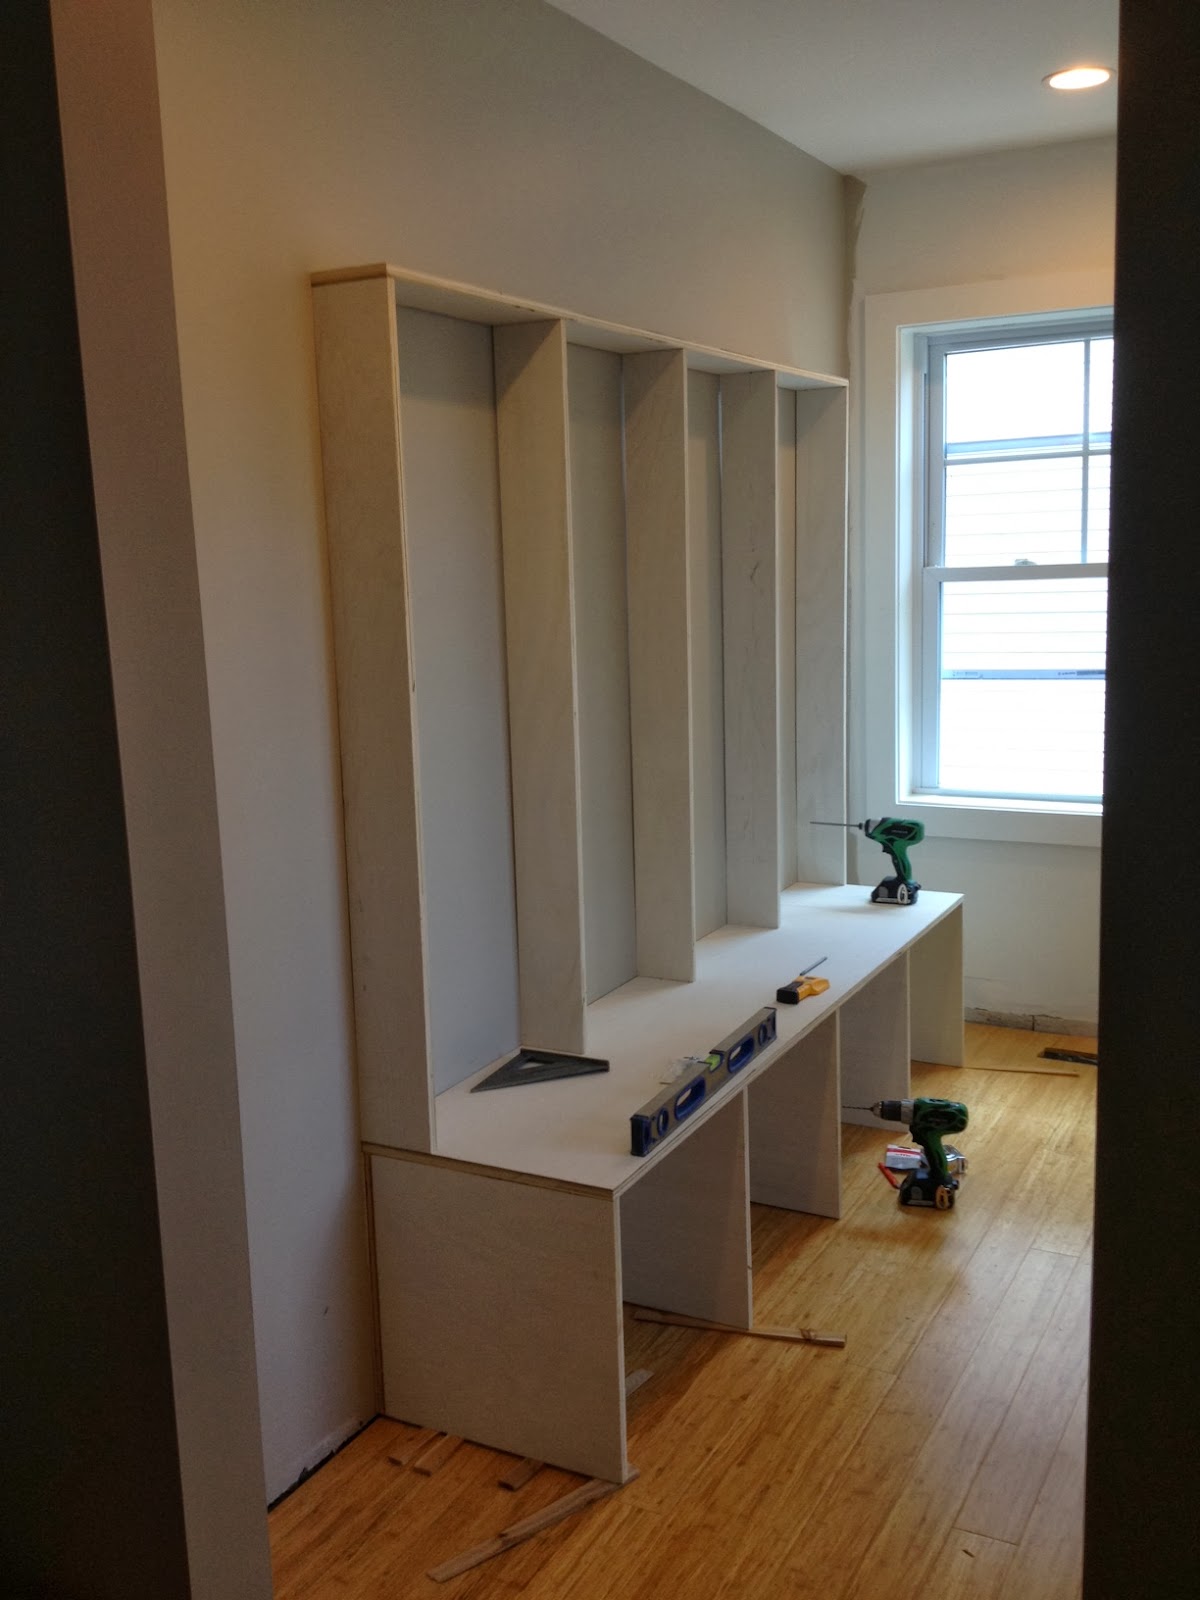
Once we made some decisions, we started by building the bench which, for anyone who is interested (and to add to the cacophony of information out there), is 79 3/4" wide.  That somewhat odd measurement breaks down into four 19" wide cubbies plus 3/4" of ply in between.  The bench height is 18 1/2" which, I might add, does not look nearly high enough when you mark it on the wall but turns out to be very comfortable once the bench is built.  Finally, the bench has a depth of 18".  We probably could have made it more shallow but we have the space and it gives the bench a nice chunky look.  From there, we built the cubbies, which are 52" high by 5 1/4", which will create 6" deep dividers once we install the trim.  They are really intended just to give some definition to the space, rather than provide a real divide.  If we didn't have the window in the mudroom, we might have made more distinct lockers, with deeper sides, but this way, we have dividers without blocking any sunlight.  Lastly, we added the storage shelves above the cubbies, which are 9" high by 11" deep to accommodate the storage baskets.  We still have quite a bit of trim to add, plus caulk and paint to finish the cubbies, and then we'll build a window seat between the closets...so there's still a lot of work to come but we're on our way to having another room finished up.
Mudroom before

Step one - build bench

Step two - add cubbies

Step three - add overhead storage shelves.  Trim, paint, hooks, etc. still to come...